There is a new way to make collages and life posters at the
HP Community Mosaic site. This site works in conjunction with the
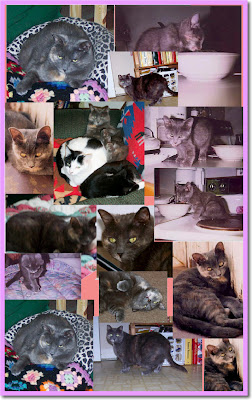
Flickr HP Community Mosaic Group. I used these tools to create Pansy's life poster above. The directions below are for Macs. Hopefully, a PC user will use the comments to modify/correct these directions for PCs.
- Select all of the photos that you want to use (a minimum of 10 is suggested).
- Upload these to your Flickr account and tag them with a very unique tag so that you can identify them in the group photo pool later. I used "meeyauw" and "Pansy."
- Join the Flickr HP Community Mosaic Group.
- Send your selected photos to the group.
- Return to the HP Community Mosaic web site.
- See the mosaic in the bottom left quadrant of the screen? Click on that.
- In the next screen, click in the text box and type your unique tags. If you have just uploaded your photos to the group, it may take a couple of minutes for them to be seen by the system. Be patient, it works.
- Click "generate." A new Flash screen will appear with your photos.
- Click "customize and print." Another Flash screen will appear with a white sheet of "paper" with your photos on it.
- Click and drag your photos around until you have what you want. If you want to discard a photo, simply drag it off of the sheet of paper. When you are finished, click "print it!."
- The rest of the directions are for Mac only if you would like to manipulate this collage image before printing.
- After you click "print it!" on the HP site, a page set up dialog box appears. Click OK.
- Now a Print dialog box appears. Click "Preview." Keep the HP window open on your desktop, just "in case."
- Preview will now create a .pdf file for you, and you can now create a .jpg image from this.
- If you like what you see, continue. If not, return to #10 above.
- Choose the "select tool" in Preview. Draw a rectangle around your collage, trimming off any excess white edges you may not want.
- Now we will crop that image. Press + K and a crop dialog box appears. Click OK.
- Now you have a new .pdf page with your cropped image. Go to the File Menu and select "save as . . . "
- In the save dialog box, select JPG, name your file, save it, and you are done!
This is a very awkward way to make a collage, but it is the only way I have been able to do this with free software on a Mac. Which is so irritating! I took my collage of Pansy and used Photoshop Elements to fill some white spaces with color. I then used ImageWell to frame the image. Is there any easier way? I hope so.
Please be aware that any photo that you put into the HP Community Mosaic Group photo pool is available to anybody anywhere to use for a mosaic. This is the best use for these tools: you can create a mosaic of anything you desire (like trees), simply by inputting the tag you want at the HP mosaic site. If you don't want anybody using your photos, don't put them there. When I called up my photos of Buddy for a collage, I got somebody's photo of a hat!
I wanted to make one collage of all seven of my cats and announce
my new Catster membership and learn from you about Catster activities. But this method of making a collage is so cumbersome that I am re-thinking that. If we have a snowstorm and a snowday, perhaps I will spend the time to do it. Right now, I have too many photos to choose from, so this method of making a collage would be very lengthy.
A note to
Mom Unplugged: this is what I was going to do for the Christmas week
Unplugged Project. A tad late, huh? This was also going to be my
Cats On Tuesday post for this past week. Late again. But at least I got it in for Caturday.
Technorati Tags: HP Community Mosiac, Flickr, Preview, ImageWell, Photoshop Elements, photo collage, Macintosh, Mom Unplugged, Unplugged Project, Cats On Tuesday, Catster, Caturday _/\_/\_

